I want one.
Tee hee!
Wish lists aside, here are three tasty dishes I've made over the past four days :)
Black Bean and Sweet Potato Chili:
Jamie Oliver's Good Ol' Chili con Carne:
and finally, Sweet Potato and Carrot Curried Lentils:
YUM.
Frequent Topics of Interest
Alice
almond butter
almonds
apartment
apples
asian pears
asparagus
avocado
bacon
baking
bananas
banans
bbq
beans
bell peppers
birthdays
black beans
Blackened Tilapia Salad
Blog Squad
blood orange
blue berries
bread
breakfast
broccoli
buckwheat
burger
buttermilk
cake
calgary
casserole
cereal
cheese
chicken
chicken pot pie
chocolate
christmas
Cimas
cinnamon
Cliff Bar
clothes
cocoa powder
coffee
cookies
cottage cheese
Cougar Football
craft
cream cheese
cream cheese frosting
curry
dance
dessert
Disneyworld
dresses
Ecuador
eggs
energy bar
faces
fair
fall
family
fashion
fast
feet
fiesta
finances
fish tacos
fitness
food
football
french toast
fruit
fun
funny
future
ginger sandwhich cookies
granola
grapefruit
greek yogurt
green beans
guacamole
halloween
home
honey
honors
hot socks
hummus
hush puppies
ice cream
iced coffee
Jamie Oliver
kale
Kashi
kiwis
Lentil and Kale Stew
lentils
letters
macaroni and cheese
marinara
me
milk
mini-bagels
muffins
mushrooms
naan
oatmeal
oatmeal bar
olive oil
onion
orange
pancakes
pasta
peanut butter
pears
photobooth
pilates
pizza
popcorn
potatoes
pulled pork
pumpkin
quiche
quinoa
rain
raisins
random
raspberry jam
recipes
Red beans and rice
review
rice
risotto
roast chicken
salmon
salsa
sausage
scary
sexy
snap peas
spicy scrambled eggs
spinach
sticky buns
sweet potato
tangerine
tea
texas
thankful
tilapia
toast
tomatoes
Travel
veggies
walking
walnuts
wsu
Year in review
yogurt
yule ball
zumba
Showing posts with label recipes. Show all posts
Tuesday, January 18, 2011
Saturday, January 01, 2011
Disney's Hollywood Studios Grapefruit Cake
This is one of the desserts that we ate on our trip to Disney World at the Hollywood Brown Derby Restaurant.
I followed this recipe exactly, except I used 1 1/3 cups regular flour and sifted the dry ingredients together four times.
The only problem making it was that our oven cooked it unevenly..... half the cake was perfect and the other half was left in a pudding state of underdone cake-y goodness. Ah well! At least it looks and tastes yummy.
photo found here
Monday, November 15, 2010
Baby Steps
Let's break down the steps to a happy night, shall we?
Step One:
Go to ZUMBA!
Step Two..... walk home in the rain..
Step Three: turn oven on to 400ºF and put a sweet potato (¡pierced with a fork a few times!) on tin foil on a cookie sheet and place in preheating/ed oven.
Go and take a shower for Step Four (See step one as to why)
Step Five, put some pj's on! And mix some canned black beans with some freshly cut jalapeño and cumin then microwave for 30 ish seconds until nice and tasty.
Step six! Remove Sweet tater from oven after letting it bake for 45 minutes, carefully cut in half, and put black beans and cheese on top! Then put back in oven after turning it off to let the cheese melt for a few seconds.
Step Seven= serve with sugar snap peas because they are amazing and should be renamed CRACK peas. Seriously. I can't stop!
BE HAPPY :-)
I went to town on this puppy. And now I'm eating even more
Monday, September 27, 2010
Lentil and Kale Stew
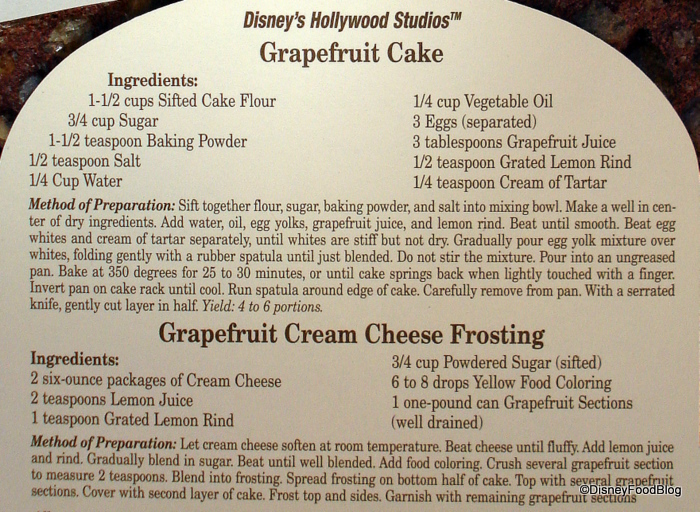
Amidst all of the excitement that was studying abroad this summer, I don't think I ever mentioned that my family and I went to Disney World this summer! I'll do a post on it at some point in the future (the photos are fun!), but first I need to mention the food.
When my family travels we figure out 1. Where we're going 2. When we're going 3. Where we're staying and 4. What we are going to eat. Usually we like to have reservations or at least plans of where we're going to eat when we vacation, because it's such a fun and important part about vacations. Plus, it's no fun to search for a place to eat when you're starving.
The same was true for Disney World. Their website is amazing: you plug in what day, restaurant, and meal (breakfast, lunch, or dinner) you would like, and they give you a list of available reservation times. You add all of these to your "cart" and then finalize it all, and you're set! Within half an hour all of our meals were planned for our trip. Score!
All of the food was incredible. I honestly cannot remember a meal I didn't thoroughly enjoy! I was so impressed, in fact, that I shelled out forty bucks for the Delicious Disney Cookbook.
This is the first recipe I have tried from it, and I like it a lot! You definitely need to like lentils, kale, and veggies (which I do!) to enjoy it!
One thing about this cookbook is that it definitely is written for a more experienced cook. It tells you the order in which to add ingredients, but not always the temperature, timing, or how-to's (how to peel a tomato, for example!).
After peeling and chopping the tomatoes:
Lentil and Kale Stew
From Delicious Disney
serves 8
1 pound petite French lentils (I used green lentils that I had from the Co-op, and about 2 1/4 cups)
2 tsp sea salt, divided
1/2 cup olive oil
1 bay leaf
1 cup chopped onion (I used one huge onion from the farmer's market)
2 stalks celery, washed and chopped
2 carrots, peeled and chopped
2 garlic cloves, mashed (this is super fun- use the flat blade of your chef's knife and pound the garlic down!)
6 ounces kale, washed and thinly sliced
5 tomatoes peeled and chopped
3 14.5 ounce cans fat-free chicken broth
1 cup fresh parsley, chopped
1 tsp freshly ground pepper
freshly grated parmesan cheese
olive oil (optional)
1. Rinse the lentils while sorting through to check for rocks, hulls, or any other non-consumables.
2. In a large soup pot, add the lentils, enough water to cover by a few inches, and 1 tsp of salt and bring to a boil. Allow to cook for about 5 minutes (maybe just a hair longer), then drain, rinse, and set aside.
3. Heat the olive oil with the bay leaf, onion, celery, carrots and garlic cloves in the same large soup pot at about a medium heat. Add the kale, stir, and allow to simmer together for about 5 minutes. Add the tomatoes.
4. Next add the lentils, chicken broth and remaining salt to the pot. Bring to a boil, turn down the heat, and allow to simmer partially covered for about 15 minutes.
5. Add parsley and pepper, and season to taste. Top with parmesan to serve.
The cookbook says that it is best eaten the day after it's made, which is what I did, sprinkled with a touch of nice parmesan. You can also drizzle olive oil over the top, but I skipped this. I also enjoyed a side of whole-wheat sourdough bread from the Co-op.
Not only was this really tasty (especially with the parmesan- don't skip this!), it is incredibly healthy. I plugged it into a nutrition and calorie facts calculator out of curiosity and was floored by the results. Check them out! The only "missing ingredient" it couldn't figure out was the bay leaf, which I'm sure doesn't add any calories ;)
Look at the amount of fiber! I feel so healthy today!
Wednesday, September 22, 2010
Easy Chick-peasey Hummus
Hummus! Ever since my mom mentioned it to me, I've been a-craving it, so I went ahead and made some for dinner.
Hummus
serves 4
1 15oz can Garbanzo beans, drained with the liquid reserved
1 clove garlic mashed or just cut up really small
2 tsp cumin (seems like a lot, is actually perfect)
1 Tbs olive oil
lemon juice
(1/4 tsp salt- optional)
Put all ingredients in blender. Blend. Mix by hand if necessary. Add some of the reserved bean liquid. EAT! I had mine with carrots, celery, and naan. Oh baby.
I tried freezing the naan- and it worked! I put them in slightly-greased freezer bags, and froze them so they weren't touching on another. As soon as they are frozen they can be touching in the bags and stacked. To cook, simply thaw, then fry with a little bit of olive oil in the cast iron. Amazing!
Sunday, September 19, 2010
Ginger Sandwich Cookies with Cream Cheese Frosting
Back when the US- Canada exchange rate was far in our favor, my family travelled to Calgary, Alberta a ton. We love the food (Moroccan, Indian, Thai, Ethiopian, the list goes on for days), the city, the hotel, the shopping, and the museums.
One particular museum is the Glenbow. They have a set number of permanent displays, and also have traveling ones as well so there's always something new to see. Plus they have an AMAZING craft room, which I'll do just about anything so I can go in and craft my heart out (see photo below and do not judge- I promise there is a hilarious story about this day!)
Anyhow, one of the biggest draws, other than the craft room of course, was that the cafe in the lobby had these amazing ginger sandwich cookies. They were two HUGE, soft ginger cookies with about an inch of cream cheese frosting in between them. Seriously too good for words. Sometimes if my sister and I didn't want to go look at the museum our parents would remind us of the cookie and we'd be sold.
This is my attempt to recreate these cookies. I didn't really want to make giant cookies with that much frosting, though, because I'd like to not go into a sugar coma after eating them!
Soft Ginger Cookies
Recipe made exactly from here, except I used unsalted butter instead ofnasty trans fats margarine.
makes 24 cookies, 12 sandwich cookies (I made 24, and still have a bit of dough leftover!)
2 1/4 cups all-purpose flour
2 teaspoons ground ginger
1 teaspoon baking soda
3/4 teaspoon ground cinnamon
1/2 teaspoon ground cloves
1/4 teaspoon salt
3/4 cup unsalted butter, softened
1 cup white sugar
1 egg
1 tablespoon water
1/4 cup molasses
2 tablespoons white sugar
Preheat oven to 350* F. Sift together the flour, ginger, baking soda, cinnamon, cloves and salt, and set aside. Beat together sugar and butter until smooth with an electric mixer, then beat in the egg before adding the molasses and water. Continue to beat until all is blended, then slowly add in the dry mixture a little bit at a time.
Grab a "walnut-sized" (???) piece of the dough, form it into a circle, and roll it in the remaining two tbs of sugar, and place on ungreased cookie sheet, and press down to flatten slightly.
Bake for 8 to 10 minutes, then allow cookies to cool on the pan for 5 minutes before moving them to the cooling rack to finish cooling.
Once all the cookies are baked and cooled, blob a decent-sized portion of cream cheese frosting (recipe below) on the flat side of one cookie, and put another cookie flat side down on top of it to make your sandwiches! Make all the sandwiches, then freeze in a freezer-proof plastic container so they can set up.
You could probably skip the freezing step, but this is how I'm storing them, and it helps prevent the cookies from flattening and all the frosting squishing out the sides.
Cream Cheese Frosting
Original Recipe Here, I just halved it
8 oz cream cheese
1 cup powdered sugar
1/4 cup butter
1/2 tsp vanilla
Cream together cream cheese and softened butter in electric mixer. Add the vanilla. Slowly add the powdered sugar and beat until combined. Allow to chill in the fridge for about 20-30 minutes before you frost the cookies :)
ENJOY!
One particular museum is the Glenbow. They have a set number of permanent displays, and also have traveling ones as well so there's always something new to see. Plus they have an AMAZING craft room, which I'll do just about anything so I can go in and craft my heart out (see photo below and do not judge- I promise there is a hilarious story about this day!)
Anyhow, one of the biggest draws, other than the craft room of course, was that the cafe in the lobby had these amazing ginger sandwich cookies. They were two HUGE, soft ginger cookies with about an inch of cream cheese frosting in between them. Seriously too good for words. Sometimes if my sister and I didn't want to go look at the museum our parents would remind us of the cookie and we'd be sold.
This is my attempt to recreate these cookies. I didn't really want to make giant cookies with that much frosting, though, because I'd like to not go into a sugar coma after eating them!
Soft Ginger Cookies
Recipe made exactly from here, except I used unsalted butter instead of
makes 24 cookies, 12 sandwich cookies (I made 24, and still have a bit of dough leftover!)
2 1/4 cups all-purpose flour
2 teaspoons ground ginger
1 teaspoon baking soda
3/4 teaspoon ground cinnamon
1/2 teaspoon ground cloves
1/4 teaspoon salt
3/4 cup unsalted butter, softened
1 cup white sugar
1 egg
1 tablespoon water
1/4 cup molasses
2 tablespoons white sugar
Preheat oven to 350* F. Sift together the flour, ginger, baking soda, cinnamon, cloves and salt, and set aside. Beat together sugar and butter until smooth with an electric mixer, then beat in the egg before adding the molasses and water. Continue to beat until all is blended, then slowly add in the dry mixture a little bit at a time.
Grab a "walnut-sized" (???) piece of the dough, form it into a circle, and roll it in the remaining two tbs of sugar, and place on ungreased cookie sheet, and press down to flatten slightly.
Bake for 8 to 10 minutes, then allow cookies to cool on the pan for 5 minutes before moving them to the cooling rack to finish cooling.
Once all the cookies are baked and cooled, blob a decent-sized portion of cream cheese frosting (recipe below) on the flat side of one cookie, and put another cookie flat side down on top of it to make your sandwiches! Make all the sandwiches, then freeze in a freezer-proof plastic container so they can set up.
You could probably skip the freezing step, but this is how I'm storing them, and it helps prevent the cookies from flattening and all the frosting squishing out the sides.
Cream Cheese Frosting
Original Recipe Here, I just halved it
8 oz cream cheese
1 cup powdered sugar
1/4 cup butter
1/2 tsp vanilla
Cream together cream cheese and softened butter in electric mixer. Add the vanilla. Slowly add the powdered sugar and beat until combined. Allow to chill in the fridge for about 20-30 minutes before you frost the cookies :)
ENJOY!
Concerning:
calgary,
cookies,
cream cheese,
cream cheese frosting,
ginger sandwhich cookies,
recipes
Saturday, September 18, 2010
Saturday Night Curry and Naan
Before:
After:
Tonight I made Vegetable Jalfrezi, an Indian-style curry from my beloved (see below) Jamie Oliver cookbook. Some of the ingredients are missing from the first photo, but you get the idea!
Here's the Recipe- it's online at Jamie's Website! I definitely recommend following his instructions; he describes how to make it perfectly, and I followed his instructions to the letter. However, the units he uses for some of the measurements need to be converted to cups and ounces, so here is the ingredient list using ounces and cups:
Vegetable Jalfrezi
1 medium onion
1 fresh red chile
a thumb-sized piece of fresh ginger
2 garlic cloves
a small bunch of fresh cilantro
2 red bell peppers
1 cauliflower
3 ripe tomatoes
1 small butternut squash
1 15oz can garbanzo beans
vegetable oil
unsalted butter
1/2 cup medium curry paste (such as Patak's), I used 1/4 cup of a hot curry paste and 1/4 cup of a mild curry paste, because the Co-op doesn't have any medium curry pastes.
2 14oz cans of diced tomatoes, or one 28 oz can works too
1/4 cup balsamic vinegar
sea salt and freshly ground pepper (I actually didn't need either)
lemons
natural yogurt, I used greek!
Ahh this was sooo delish. It definitely took some time to make, but was well worth it. And now I have a ton of leftovers! Bonus!
Here's what I served with my curry:
lemon wedges, plain greek yogurt, and cilantro. .
NAAN!!! Recipe found here.
And finally the curry was served on top of a bed of steamed, white rice with cilantro. Yum.
Curried Tilapia
Curried Tilapia
From Jamie's Food Revolution, except I just made it for one person :)
1 tilapia fillet, thawed if frozen
1.5 Tbs mild curry powder
salt and pepper
small pat of butter
lug of olive oil
cilantro
lemon or lemon juice
plain yogurt (I used greek)
Put the curry powder, salt and pepper on a plate, and press the fish onto it one side at a time until completely covered with the spice mixture.
On high heat and in a nonstick pan, heat the olive oil and butter. Add the fish and cook for about 3-4 minutes, spooning the hot oil over the top of it to help the other side cook. Then flip it, and continue cooking until cooked through, about another 3-4 minutes. Do not be tempted to undercook this sucker. I did, and the middle of my fish was rather rare (sushi anyone?).
Serve on a bed of rice with cilantro leaves on top, a squeeze of lemon, and a dollop of plain yogurt. This is a super fast recipe- I easily made it in under half hour.
Wednesday, September 15, 2010
Homemade Crunchy Buckwheat Granola
I've been craving granola for my oatmeal for quite some time now, but either couldn't bring myself to buy it (it's kind of expensive!) or would forget to every time I went to the store. So, when I read about this recipe on Kath's blog I really wanted to try it out.
I had a hard time finding the Buckwheat: I went to dismore's and safeway with no success, but finally found some at the Coop in Moscow. That store is amazing. I'll have to do a separate post on it someday.
But I digress. Short story short, I found and bought the ingredients, I made the granola, and it tastes something wonderful, and has an awesome crunch to it. Yum yum!
Crunchy Buckwheat Granola
From here
2 cups raw rolled oats
1/4 cup raw almonds (or I think any other nut would work here as well)
3/4 cup raw buckwheat (aka groats)
3/4 cup raw sunflower seeds
1/4 cup canola oil or coconut oil (I used coconut which was awesome)
1/4 cup honey (or a mix of honey and maple syrup, which is also tasty!)
1/4 tsp salt
1/2 tsp cinnamon
1 tsp vanilla
Combine dry ingredients in big metal bowl. Combine wet ingredients in separate bowl, then add them to the dry ingredients and stir until all is mixed through.
Bake in the metal bowl or in 9X9 baking pan at 300* for 1 hour, stirring every half-hour. After the hour, remove from oven and stir again about every half hour while it's cooling. Some of it will seem to clump together and/or stick to the pan. This is a-okay!
Cool completely before storing. Enjoy!
Saturday, September 11, 2010
Blackened Tilapia Salad
One of my favorite restaurant meals is at a pub in the Salt Lake City airport, called Squatters. My mom and I ordered this salad the first time, and I have had it at least one or two more times since (which is something because I don't fly all that often).
I really want to recreate this salad at home, so I looked up Squatters to find a description of the salad on their website. Here it is:
Yum?? Yes. Plus they use really great ingredients (local & organic when they can!)
In recreating it there were four basic steps. The Quinoa, the blackened Tilapia, the guacamole (in the airport this is what they use instead of avocado slices) and the cilantro lime dressing. I skipped out on the fried "tortilla ribbons" and the aioli sauce this time around.
High points: the guacamole, cilantro lime sauce, quinoa, and spinach were amazing. Especially the quinoa and guacamole. The only thing that wasn't amazing was the tilapia! :( It was just too darn spicy!!! Next time I'll use a different recipe for the tilapia. Other than this though, it was really tasty. Maybe next time, actually, I won't use any tilapia.
Here is the recipe(s):

Blackened Tilapia Salad
original recipe here
Part One: Cooking the Quinoa
1/2 cup uncooked, dry quinoa
3/4 cups cold water
pinch of salt
Let the quinoa soak in water for about 15 minutes. Use hotter water if you need it to hurry along. Pour the water off of the top, then rinse it with a mesh strainer under running water for quite some time. Don't just dump it right into the strainer before draining it. The drained water has some bitter flavoring from the quinoa that you want down the drain!
Put the rinsed quinoa into your cooking pot and add the water and salt. Let it come to a boil on high heat uncovered, then cover it with a tight lid, turn the heat down to low, and allow it to cook for another 15 minutes. After this time, keep it covered, but remove from heat and let it sit, covered, for another 5 minutes.
When this is done open the lid and fluff it with a fork! You can use it right away or (like I did) let it cook and store it in a glass container in the fridge to use later.
Part Two: The Blackened Tilapia
Adapted from here
1 tilapia fillet, thawed if frozen
1 Tbs paprika (I ran out, so used less than this)
1 tsp salt (I used more like 1/2 tsp actually)
1 tsp onion powder
1/2 tsp pepper
1/4 tsp cayenne pepper
1/4 tsp thyme
1/4 tsp oregano
pinch of garlic powder
1 tsp vegetable oil
Mix all the spices and oil together to form a rub. Rub the rub (!) on both sides of the fillet. Allow the fillet to sit with the rub at room temp for about half an hour.
When it's ready to be cooked, heat a large non-stick frypan at medium-medium high, and plop the fillet into the pan. Let it cook until the opaqueness is creeping up the sides of the fish (about 3 minutes) then flip it over and finish cooking on the other side. Serve immediately.
Part Three: The Cilantro Lime Sauce
Adapted from here
1/2 jalapeno seeded and chopped
1 small garlic clove, chopped
about 1 tsp fresh chopped/minced ginger
Pop these ingredients into a blender, and give it a whirl. When they're pretty well mixed/chopped, add the rest of the ingredients.
Juice of 1/2 lime
3 Tbs honey
1 tsp balsamic vinegar
1/4 tsp salt (again, I used a little less)
2 Tbs super-packed fresh cilantro
Mix it all together and liquify the crap out of it!!! Then add:
2 Tbs olive oil
Mix it all together a final time, pour it into a resealable container, pop it in the fridge, and save it for later.
Part Four: THE GUACAMOLE!!!!!
1 avocado
juice of 1/2 lime
about 2-3 tbs chopped cilantro
a few chunks of tomato
salt and pepper to taste
Mush up avocado. Stir in lime, cilantro, tomato, and salt and pepper. Be happy.
ASSEMBLING THE SALAD!!!
Start with a bowl/plate thing. Add spinach. Add about 1/3 cup of your cooked quinoa. Add the guacamole in a big blob on the side. Sprinkle about 1 Tbs of the cilantro lime sauce over the spinach and quinoa. Add the cooked blackened tilapia on top!
Have a glass of water handy, this tilapia is intense. Or just omit it all together, there's easily enough flavor with the cilantro lime sauce and the guacamole to make that okay!
Wednesday, September 08, 2010
Oatmeal 101
Today's oats were possibly the best. Ever.
Oh, and this is post number 101!
How perfect!
But first, I must share the backstory to this bowl of delicious (and nutritious!) breakfast oats. There I was, minding my own business, reading through one of my mom's old Prevention magazine. I love this magazine to death, but that's another tangent. ANYHOW, in sed magazine, they recommended adding cocoa powder to something (I can't remember what) because 1 Tablespoon packs in 2 grams of fiber, awesome taste, and only 10 kcal. I do not need to be told twice to add chocolate to anything, so I knew that my oats the next morning would be some sort of chocolate-y goodness.
Now I take my dark chocolate very seriously. I also take my peanut butter and dark chocolate combinations seriously.
Enter dark chocolate + peanut butter oats!!!!!!!!!!!!!!!!!!!!!!!!!!!!!!!!!!!!
Oh goodness.
1/3 cup oats
1/3 cup skim milk
1/3 cup water
1 sliced up banana
Heat these all up on the stovetop (in a pan of course....) on medium until the oats start to bubble with excitement, then stir a bunch. Wait a few seconds more, let the oats continue to bubble, then stir, stir, stir!
Remove from heat, and stir in the following:
1 Tbs dutch unsweetened cocoa powder (the darker the better)
a sprinkle of cinnamon
about 1 Tbs peanut butter, blobbed on top like in the photo
Then take a photo, only one, because you won't be able to wait much longer to chow down on this puppy!
Monday, September 06, 2010
Potato Onion Quiche
Adapted from Smitten Kitchen here.
Savory Tart Shell
6-8 baby potatoes
4 baby onions (or one large onion)
Extra Virgin Olive Oil
1 Tbs apple cider vinegar
about 1/3 cup Mozzarella cheese, grated
3 eggs
1/4 cup skim milk
Assorted spices (I used oregano, thyme, and basil)
Preheat oven to 350. Scrub and slice the potatoes into about 1/4-inch thick discs. Put the potatoes in a large saucepan, cover with water to two inches over the taters, and boil until they're tender, about 15-20 minutes for me.
Slice the onions, and saute with a little olive oil. After they've started to brown, add the vinegar, and let them cook until carmelized. This will take forever.
Whisk together the eggs and milk.
Lay potatoes in tart shell, place onions on top, gently pour milk and egg mixture over the top, sprinkle the cheese over the top, and finally add the spices. Bake at 350 degrees for 45 minutes, or until egg mixture is set, cheese is melted, and your apartment smells amazing.
Let it cool, eat a spinach salad, then cut, serve, salt, and eat!!!!!
Savory Tart Shell
Slightly adapted from Smitten Kitchen here.
1 1/4 cups whole-wheat flour
1 Tbs plus 2 tsp cornstarch
1/4 tsp salt
6 Tbs unsalted butter, cubed
1 large egg
Mix dry ingredients. Add the cubed butter, and use hands to turn it into something that resembles granola, leaving some lumps. Finally add the egg, and mix more with hands until it turns into a very tough dough sort of thing that (for me!) won't stick together. Sprinkle this mixture over a lightly greased quiche pan and press and press (and press and press.....) until it all sticks together and resembles a pie crust! This will take forever. You may need to sprinkle in the tiniest amounts of water.
Subscribe to:
Posts (Atom)